Hibob Guide: Custom Fields

Please follow Hibob's documentation on how to manage (custom) fields inside Hibob. If you encounter issues inside Hibob itself, please consult their support.
How do I Synchronize a Hibob custom field in BrynQ?
In this Guide we will demonstrate how to add a Hibob custom field to BrynQ, so that the interface can synchronize the infromation from the custom field to the target system.
As an example, we will attempt to add the 'Cost center' custom field to our interface, which we have located under category 'Personal'.
Step 1:
Locate the field's details in Hibob

How can I check if a field is a custom field or one of Bob's out of the box fields?
From the left menu, select Analytics > Reports, then click My reports then + Add new.
From the left menu, select Analytics > Reports, then click My reports then + Add new.
Select Report > Use a template then search for People's data fields and click Generate.
In this report, you can see all the Custom fields and columns.

BrynQ remark: We actually see the report as 'Employee fields'.
This report includes the technical details needed to be entered into BrynQ. Please make sure you have the report in front of you.
We find our custom field 'Cost Center' as:
The information needed is the Category, Display Name, Field Type and ID.
Step 2 - Add custom field in BrynQ
A) Navigate towards the scenario in question. (See 'Where can I find scenarios?')
B) Make sure you are in draft mode.
In our example, we need to navigate to the cost center scenario, and we want to sync the custom Hibob 'Cost Center' value to the target's "Cost Center ID".
C) Make sure the field type on the Hibob side is a custom field, do this by selecting the field type symbol, and select 'Custom field' (if not yet set).
D) Click on the 'Select one or multiple Fields' dropdown, and subsequently click on the '+ Add new custom field' button.
A window should appear:
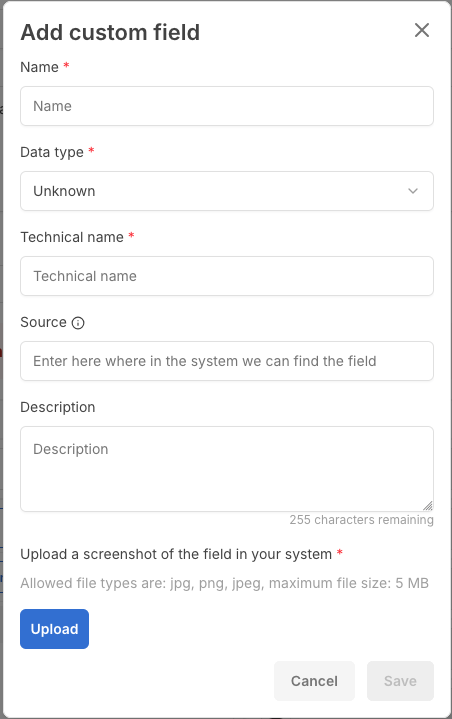
E) Enter the following information:
Hibob's Display Name into Name *
Hibob's Field Type into Data Type *
Hibob's ID into Technical name *
Hibob's Category into Source
Optional: Description as suitable
If still required - upload a screenshot of your report.
In our Example it looks like this:
A correct Technical name is crucial, it is how BrynQ can agree with Hibob on the right field.
E) Double check whether the information is correct, and click 'Save'.
Congralutions! You have added a custom field in BrynQ!
F) Use our data validation module to verify BrynQ can indeed extract the data of the custom field. If not, the technical name may have been erronously entered or the right permissions may not have been set.